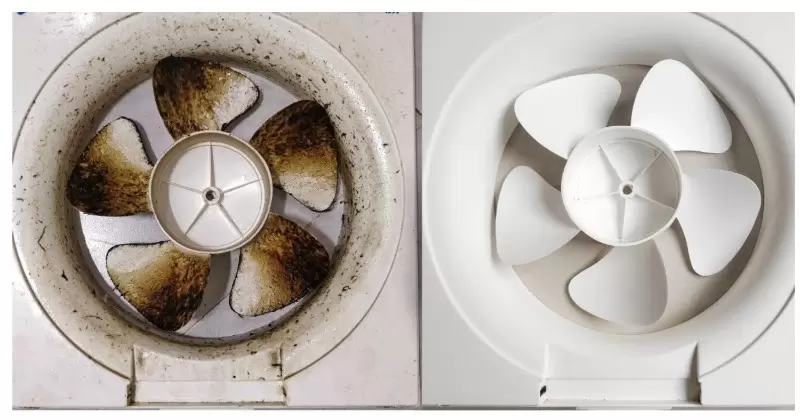
The kitchen extractor fan is an essential component of any kitchen as it helps eliminate cooking odors, heat, and grease particles in the air. However, over time, this hard-working appliance can become clogged with grease and dirt, reducing its efficiency and turning it into an eyesore.
Cleaning your kitchen exhaust fan not only improves its performance but also improves the overall cleanliness and appearance of your kitchen. In this comprehensive guide, we’ll walk you through the steps to clean your kitchen exhaust fan and restore it to a shiny, like-new condition.
Why it is important to clean your kitchen exhaust fan
Before we dive into the cleaning process, let’s understand why it is crucial to keep your kitchen exhaust fan clean.
- Improved Air Quality: A clean exhaust fan is better for filtering kitchen air and removing kitchen fumes and contaminants effectively. This, in turn, helps maintain better air quality in your home.
- Improved Safety: A dirty exhaust fan can become a fire hazard. Grease buildup on fan blades, housing, or filters can ignite under the right conditions, posing a significant risk to your kitchen and home.
- Optimal performance: A clean exhaust fan works more efficiently. When the blades and filters are free of grease and dirt, the fan can move air more effectively, allowing it to do its job of removing smoke, heat, and odors.
- Long service life: Regular maintenance extends the life of your kitchen exhaust fan. A clean fan is less likely to break down, saving you money on costly repairs or replacements.
- Improved Aesthetics: Cleaning your kitchen exhaust fan also has an aesthetic advantage. A shiny, like-new exhaust fan complements the overall appearance of your kitchen and creates a more welcoming atmosphere.
Now that we understand the importance of cleaning your kitchen exhaust fan, let’s delve into the step-by-step process to make it shine like new.
Step 1: Safety first
Before you begin, ensure your safety. Here are some safety precautions to keep in mind:
Turn off the power supply to the exhaust fan at the circuit breaker or switch.
Let the fan cool if it has been in use recently.
Wear protective equipment, including gloves and safety glasses.
Keep a fire extinguisher nearby as a precaution.
Step 2: Gather Your Cleaning Supplies
You will need a few items to effectively clean your kitchen exhaust fan:
- Screwdriver
- Cleaning solution (a mixture of warm water and dish soap or a commercial degreaser)
- Baking soda
- Soft bristle brush or old toothbrush
- Microfiber cloths
- Large bucket or bowl
- Paper towels
- Replacement filters (if necessary)
Step 3: Remove the filter
Start by removing the exhaust fan filter. Most filters can be easily removed without the need for tools. If you are unsure how to remove your specific filter, consult your owner’s manual or manufacturer’s instructions.
Step 4: Soak the filter
Fill a bucket or large container with warm water and add a generous amount of dish soap or a commercial degreaser. Place the filter in soapy water and let it soak for at least 10 to 15 minutes. This soaking process will help soften and loosen grease and dirt.
Step 5: Clean the fan blades and housing
While the filter soaks, pay attention to the fan blades and housing. Use the screwdriver to remove the fan cover, exposing the blades and the inside of the fan housing.
Dip a soft-bristled brush or old toothbrush into the cleaning solution and gently scrub the fan blades and housing. Be thorough and pay special attention to areas with a lot of fat accumulation. For stubborn stains, mix a paste of baking soda and water and apply it to the affected areas. Let it sit for a few minutes before scrubbing.
Step 6: Rinse and Dry the Filter
After the filter has soaked for a sufficient amount of time, remove it from the soapy water and rinse it thoroughly with clean water. Be sure to rinse off all soap residue.
Place the filter on a towel or paper towel and let it air dry. Once dry, it’s time to reinstall it on the exhaust fan.
Step 7: Clean the Exterior and Surrounding Area
Don’t forget to clean the outside of the exhaust fan and the area around it. Clean the fan cover, switches or controls, and any nearby surfaces that may have accumulated grease or dirt.
Step 8: Reassemble and Restore Power
Once everything is clean and dry, reassemble the fan, ensuring all parts are securely in place. Turn the power supply back on and test the fan to make sure it’s functioning properly.
Step 9: Regular Maintenance Tips
To keep your kitchen exhaust fan in tip-top shape, consider these maintenance tips:
- Clean the filter regularly, at least once a month.
- Wipe down the fan cover and surrounding area during your routine kitchen cleaning.
- If you notice any unusual noises, vibrations, or decreased performance, have the fan inspected by a professional.
Conclusion
A clean kitchen exhaust fan not only enhances the air quality in your kitchen but also contributes to a safer and more attractive kitchen environment. By following the steps outlined in this guide, you can easily clean your kitchen exhaust fan and leave it sparkling like new. Regular maintenance will extend the life of your fan, ensure optimal performance, and keep your kitchen looking and smelling fresh. So, roll up your sleeves and give your kitchen extractor the love it deserves. Your kitchen will thank you.

Add Comment